Brooding Methods
Infrared lamps
provide a convenient heat source for brooding chicks. Use
porcelain sockets approved for these lamps and suspend the lamps
with a chain or wire (not the electric cord) so they are no
closer than 15 inches to the litter. If the average brooder
house temperature is 50 degrees F, one 250 watt infrared lamp is
generally sufficient for heating 80 chicks. One chick can be
added to this estimate for every degree over 50 degrees F. You
should use more than one lamp so the chicks will not be without
heat if a lamp burns out. Supply more heat by lowering the lamps
to 15 inches above the litter or by using more or higher-wattage
lamps. To reduce heat, turn off some lamps, use smaller lamps,
or raise the lamps to 24 inches above the litter. You are
heating the chicks only and not the air, so air temperature
measurements cannot be used as a guide to chick comfort when
using infrared lamps.
Small brooders
with an electric heating element can be purchased for brooding
small numbers of chicks. Variations of a simple light bulb
brooder can be made using Figure 2 as a guide. Change the bulb
size in this unit to adjust the temperature. Most of the larger
brooders use gas or oil as fuel to more adequately supply heat.
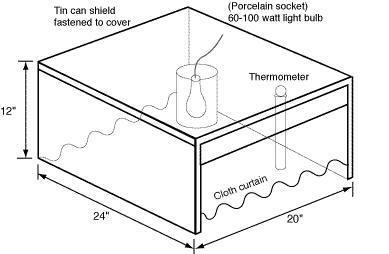
Figure 2. Brooder for 25-50 chicks
When using a
brooder, start the chicks at 90° to 95° F, measured 2 inches off
the floor under the edge of the hover. Reduce the temperature by
5°per week until the supplemental heat is no longer needed.
Observe the chicks to gauge their level of comfort. If they
crowd together under the brooder, increase the heat, but lower
the temperature if they tend to move away from the heat source.
Allow 7 -10 square inches of space under the brooder for each
chick. Start the brooder the day before the chicks arrive and
adjust to proper operating temperature.
Space and Equipment
Recommendations
Provide half a
square foot of brooder house space per chick from 1 day to 6
weeks of age. Allow 1 ½ to 2 square feet of floor space for
Leghorn pullets and 2 to 2 ½ square feet for heaving breed
pullets confined during the growing period.
Place feed on
chick box lids or trays from cut-down card-board boxes for the
first few days. Feed and water should be available to the chicks
as soon as they arrive. Provide 1 lineal inch of feeding space
per chick at the hoppers at first and increase to about 2 inches
after chicks are 2 weeks old. After 8 weeks, provide 3 to 4
inches of feeding space for growing pullets. A hanging tube-type
feeder 15 inches in diameter will feed about 30 birds. Less feed
is wasted by filling hoppers only half full and adjusting feeder
height or size to bird size.
Provide a
one-gallon water fountain per 50 chicks during the first 2
weeks, Increase the number or size of waterers from 2 to 10
weeks to provide 40 inches of watering space per 100 birds or 1
gallon capacity per 10 birds if using fountains. Roosts may be
used with pullets after 6 weeks of age. Use poles of 2-inch
lumber with top edges rounded and placed 12 to 15 inches apart.
The roosting rack can be on a slant, from floor level to about
24 inches high at the rear, or it can be placed on a screened
platform over a droppings pit. Allow 6 lineal inches of roosting
space for pullets.
Feeding
For the small
flock owner, a complete feed obtained from your local feed
dealer is convenient. Farms that have adequate mixing facilities
for other livestock operations can use local grains mixed with
the appropriate commercial concentrate. Follow the directions
provided by your local supplier. A starter mash is generally fed
for the first 6 to 8 weeks. Pullets are then fed a grower or
developer mash until they are ready to lay at about 20 weeks of
age. They should be fed a laying mash when they start to lay
eggs.
Pullets having
access to a yard or range can supplement their diet with green
feed. Chicks or pullets should have some chick- or pullet- size
grit available at the appropriate age. Try to keep your growing
pullets within body-weight guidelines provided by the breeder.
Health and Sanitation Practices
Isolation from
other birds is the first rule in preventing disease. Restrict
unnecessary traffic of people and pets into the poultry house.
If different ages of chickens are present on the farm,
physically separate the flocks as much as possible and care for
the younger birds first. Disease and parasite control will be
easier if the birds are kept confined. Rotate yard and range
areas so that birds are not on the same ground year after year.
Keep the premises free of rodents and screen free-flying birds
from the poultry house. Obtain chicks or pullets that are from
Pullorum-typhoid clean stock. A vaccination program for
Newcastle disease and bronchitis is desirable, particularly if
there are other poultry flocks in the area. Have chicks
vaccinated at the hatchery for Mareks disease. Good sanitation
and a low-level coccidiostat drug in the feed during the
brooding and growing period will usually prevent coccidiosis.
Examine birds occasionally for lice and mites. A local
veterinarian, county Extension educator, or commercial field
serviceman can assist you with flock health and other management
problems or will direct you to a competent source of help.
Clean waterers
daily and periodically wash with a sanitizing solution. Maintain
litter in good condition and remove caked and wet spots. Add
additional litter as necessary. Adjust ventilation to avoid
moisture and ammonia build-up in the house.
Cannibalism often
occurs in growing and laying flocks and is difficult to control
once it has started. Various factors contribute to cannibalism,
including crowding, nutrient deficiencies, inadequate
ventilation, too little drinking and eating space, too much
light, idleness, and the appearance of blood on injured birds.
Good management can frequently control many of these
contributing factors. In many small flocks, a pick-paste remedy
can be used with success in many instances if the problem has
not gotten out of hand. Beak trimming is a more permanent
solution to the problem. Many hatcheries will beak-trim chicks
at day-of-age, if you request. Birds can be beak- trimmed at any
age if done properly, but avoid times of stress or when pullets
are coming into production.
|